Steps in Drilling Through Tiles Safely
Have you ever wondered how to drill into tiles without them breaking into millions of tiny little pieces? Before you try this at home and rush into pressing that “START” button, read through and follow these important steps to ensure that the tiles you have just spent so much time and money on don’t break within seconds –
Step 1: Install the proper drill bit
When wanting to know how to drill into tiles safely, using the right drill bit is very important. There are two types of drill bits recommended to drill through a tile without breaking it.
- Diamond-tipped drill bits – are the most durable and suitable drill bit and can often be quite expensive, however, this particular drill bit is known to be the best for drilling through tiles without shattering them (mainly used for porcelain tiles that have a hard biscuit).
- Carbide-tipped masonry drill bits – are designed for drilling into hard-rock surfaces. Although they are not as durable as the diamond-tipped drill bit, they can be just as effective, with patience and accuracy (suitable for ceramic tiles that generally have a softer biscuit).
Step 2: Support the tough surface layer of the tile

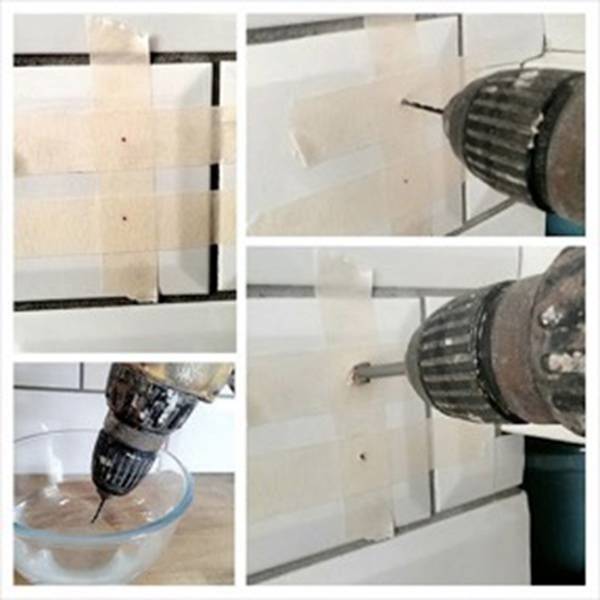
To ensure this step runs smoothly, follow these extra tips (see photo illustration):
- Mark an “X” over the spot that needs to be drilled by using masking tape.
- By using masking tape, the drill bit can have surface traction. This also ensures that if the drill were to slip from the marked “X”, it would not damage the tile but only the tape.
- Check the depth required for the project and mark the drill bit with masking tape at the depth that you require.
- DO NOT use the hammer drill setting to start with as this can crack the tile before you start.
Step 3: Keep drill speed consistent, making sure the drill bit does not overheat
The hard part is over, now comes the most important step to ensure the tile does not break. The trick is patience and accuracy. Once the drill bit has broken through the surface of the tile, use the drill at a consistent speed until you break through the wall at a depth that is required for your project.
IMPORTANT: Always check that the wall you are drilling through does not have water or electrical cables behind the tiles.
To avoid overheating the drill bit (which can occur when using it for a long period of time), frequently pause from drilling and dip the drill bit portion in water, as it will be ruined if it is allowed to overheat.
Step 4: Decrease drill speed and pressure as you finish
Once you have drilled through the tile, the pressure is off and the job is nearly done. Ensure you decrease the speed and pressure of the drill and remove the drill bit slowly from the tile. Once this step is completed, you are finished and hopefully have successfully drilled through a tile without breaking it.
For more tile flooring advice, pop into your local Tile Wizards store and talk with one of our friendly staff. You may also browse through our range of quality tile products available in-store.
Tile Wizards stores are located in and around Brisbane, Coffs Harbour, Sunshine Coast and Adelaide.
YOU MIGHT ALSO LIKE TO READ:
Calculating Tile Quantities
One of the tasks in tiling projects that many people find difficult is calculating for tile quantity. So, we have come up with some helpful tips on how to estimate the number of tiles that you will be using for the area that you plan on tiling. We have also embedded a tile calculator for your convenience…READ MORE


